How to Plan a Home Renovation, Step by Step (With a Printable Checklist)
Published on
To plan a home renovation, write the scope room by room, find out what the house is hiding, build the budget around your decisions, decide who does each part, lock your selections, and only then put the work in order. Each step answers a question the next one depends on, so skipping ahead is how jobs end up redone.
The steps below include the decision points that change the plan, with notes for older houses in the Charleston area. A printable checklist sits at the end.
Step 1: Write the scope room by room, needs before wants
Start on paper, not with a contractor. The National Association of Home Builders suggests writing a prioritized list of your needs and wants and thinking through how you’ll use each space: traffic patterns, furniture, light. Go room by room and give each item a label: must happen now, would like, can wait.
Then look at the list for one thing: does anything change the structure or the footprint of the house?
- If yes (moving or removing walls, adding a room, raising a second story, new porches or decks), the plan needs an architect or engineer before it needs a renovation contractor. Drawings come first.
- If no (floors, bathrooms, tile, kitchen finishes, trim, paint, the plumbing and electrical that go with them), you can move straight to the next step.
Step 2: Find out what an older house is hiding
A budget written before anyone looks behind the surfaces is a guess. In older houses, three things are worth knowing about before you commit:
- Lead paint. Under the EPA’s Renovation, Repair and Painting rule, anyone paid to disturb painted surfaces in a home built before 1978 must be certified and trained in lead-safe work practices. South Carolina isn’t one of the states that run their own program, so the federal rule applies here.
- Asbestos. The EPA’s advice is to leave intact material alone and, when remodeling will disturb something suspect, have it sampled by an accredited inspector first.
- Moisture and old repairs. Soft spots, stained subfloor and wood floors with cupped boards point to water that has to be dealt with before new finishes go on.
Some things only show up once a wall is open. When that happens on one of our jobs, we stop, show you what we found, and document the change and its cost before carrying on, so you approve it in advance rather than discovering it on the final invoice.
Step 3: Build the budget around decisions, not a single number
NAHB’s advice is to work out what you have to spend on the whole job, including furnishings and anything else the project pulls in. The harder part is that two houses of the same size can land far apart, because the price follows decisions more than square footage:
- How many bathrooms are in scope, and whether plumbing moves.
- Whether the kitchen is part of it, and which parts of it.
- The materials: species of wood, size and pattern of tile, natural stone or porcelain.
- The condition of what’s underneath: subfloors, framing, old wiring and plumbing.
- How the work is staged, especially if you are living in the house.
Keep a reserve for what Step 2 can’t see. And ask for a written estimate broken down by area, not one lump sum, so you can move items between “now” and “later” without starting over. Ours comes with the order the work will run in, and changes are documented in advance rather than after the fact.
Step 4: Decide who does each part of the work
The structural question from Step 1 decides the first split. Architects and engineers draw and size what changes the structure; a renovation contractor builds the interior around it.
For the interior work, the choice is between coordinating separate trades yourself or hiring one contractor who runs them under a single schedule. Separate trades can work if you have the time to sequence them; otherwise the job of chasing four different phone numbers falls on you.
Whichever way you go, check three things before you sign:
- The contractor’s South Carolina license, which you can look up with the SC Department of Labor, Licensing and Regulation, and proof of insurance.
- For a pre-1978 house, the firm’s EPA lead-safe certification.
- A written scope that says what is excluded as clearly as what is included.
For our part, we renovate the house that’s already standing. We don’t do architectural drawings, additions, second stories, decks or new construction, and we say so on the first call.
Once any structural work is handled by someone else, our whole-home renovation in Charleston work covers the floors, bathrooms, tile, kitchen finishes, trim, drywall, paint, plumbing and electrical under one schedule and one point of contact.
Step 5: Lock your selections before demolition day
Every finish that isn’t chosen and ordered before work starts is a day a crew may be waiting. Decide the flooring, tile, vanities, fixtures and paint colors while the house is still intact, and confirm when each will arrive.
Two details save trouble later. Order extra tile for cuts and future repairs, because dye lots change. And if part of the plan is new tile over an old floor, settle first whether tiling over existing tile is sound in that room, since it changes the demolition, the floor height and the budget.
Decision point: if a key selection still isn’t made, it is often better to move the start date than to start and stop.
Step 6: Put the work in the order that protects it
The right order is the one where no finished surface gets damaged or torn out by the trade that follows. For an interior renovation, it typically runs like this, with details shifting by job (some floors go down before cabinets, some after):
- Protection of what stays, then demolition.
- Repairs to framing and subfloors that demolition uncovered.
- Plumbing, electrical and HVAC rough-ins, inspected before walls close.
- Insulation, drywall and the waterproofing in wet areas.
- Tile, cabinets and built-ins.
- Flooring, then trim.
- Paint, fixtures and hardware, final inspections and a walkthrough with a punch list.
The inspections are why the order matters. In the City of Charleston, an alteration that touches electrical, gas, mechanical or plumbing work needs its own sub-permits, and the guidance lists rough-in inspections for those trades along with framing and insulation inspections before the finals. Close a wall early and it may have to be opened again.
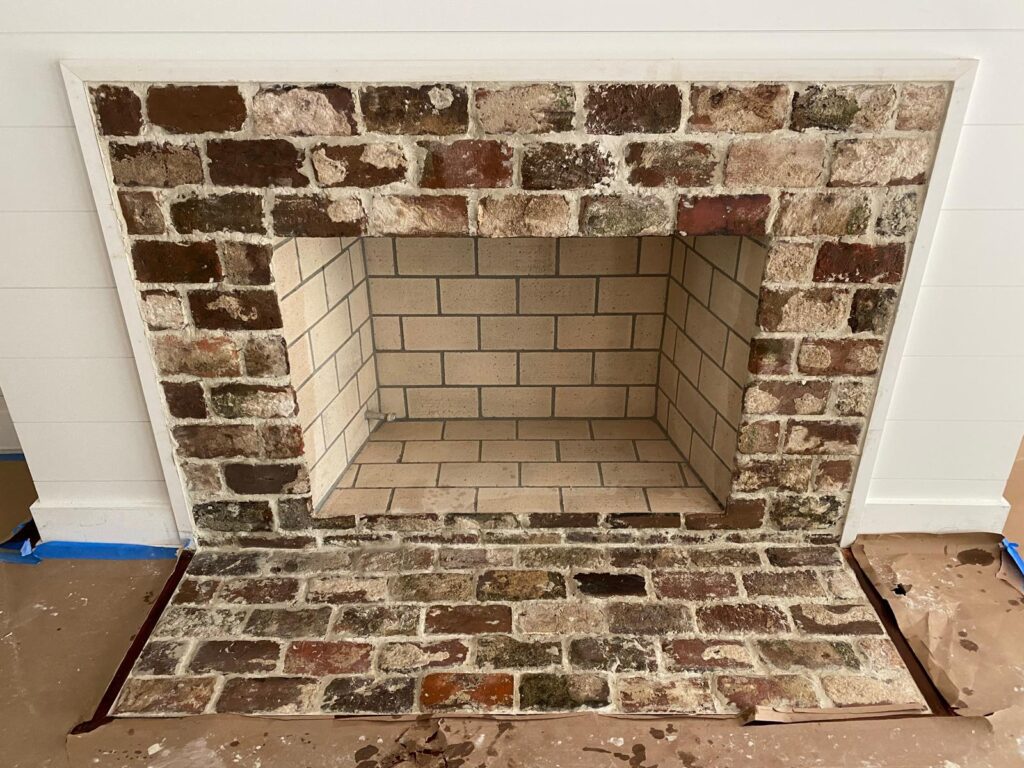
Protection runs through the whole job: here the floor around a rebuilt fireplace stays covered while the work around it is finished. If you plan to live in the house during the work, the sequence also has to keep a working bathroom and kitchen available, which is often possible when the job is staged for it.
What decides how long it takes
The length of a renovation comes from the plan more than from the crew. The main drivers are the scope, how many trades are involved, when the inspections can be scheduled (walls can’t close before the rough-ins pass), when the selections from Step 5 arrive, and what demolition uncovers.
Staging the work so you can keep living in part of the house changes the sequence too. Ask for a realistic schedule with the written estimate, and for updates as the work moves.
What you can take on yourself
The planning steps are yours either way: the scope list, the selections, clearing the rooms. If you want to do some of the work, two rules apply.
In the City of Charleston, a homeowner acting as their own contractor files a Register of Deeds form before the permit, according to the City’s alteration guidance.
And while the EPA’s lead rule generally doesn’t apply to owners working on their own pre-1978 home, the EPA still recommends lead-safe practices for anyone who does it themselves.
A printable renovation planning checklist
Print this page or copy the list. Each line is something to have answered before moving to the next stage.
Before you call anyone
- Room-by-room list, each item marked now, would like, or can wait
- Any change to walls, footprint or height flagged for an architect or engineer
- Year the house was built (before 1978 means lead-safe rules apply)
- Photos of problem areas: soft floors, stains, cracks, old repairs
Before the estimate visit
- Total you are prepared to spend, including furnishings
- Which rooms must stay usable during the work
- Questions about anything suspected to contain asbestos
Before you sign
- SC contractor license checked and insurance certificate in hand
- EPA lead-safe certification, if the house is pre-1978
- Written estimate broken down by area, with what’s excluded
- How changes and surprises will be documented and approved
- Who applies for the permits and schedules the inspections
Before demolition day
- Flooring, tile, vanities, fixtures and paint chosen and ordered, with arrival dates
- Extra tile ordered for cuts and future repairs
- Furniture moved, and who moves what agreed in writing
- Rooms and floors that stay protected during the work
Before the final payment
- Final inspections passed
- Walkthrough done in daylight, punch list written and completed
- Care instructions and cure times for finishes, tile and grout
When the list is ready, the next step is a walk through the house together. Book a free whole-home renovation consultation: we walk every room with you, agree the scope and put a written estimate, broken down by area, in your hands. If you’d rather start with a question, send us your list.
Keep reading