Why Do Shower Tiles Crack? 7 Installation Mistakes and What the Crack Tells You
Published on
The usual mistake with a cracked shower is blaming the tile. Why do shower tiles crack? Most of the time because something behind or around them moved or got wet: a wall or floor that flexes, grout packed into a corner that needed a flexible joint, the wrong backer board, or water working its way behind the tile.
A dropped bottle or a slipping drill bit accounts for most of the rest. The Tile Council of North America (TCNA), which publishes the TCNA Handbook and the ANSI tile installation standards, even calls defective grout the least likely explanation when grout cracks.
Below are the seven installation mistakes its guidance and the building code point to, how to tell them apart by the pattern of the crack, and when a repair will hold.
Cracked tile or cracked grout? Check which one first
Run a fingernail across the line. If it catches on the face of a tile, the tile itself has broken. If the line follows the joints between tiles, it’s the grout, and grout has its own list of causes.
Cracked shower grout is common, but it isn’t normal wear. In its answer on cracked and loose grout, TCNA names a substrate that deflects, grout never packed to the back of the joint, grout mixed with too much water or additive, and grout re-mixed after it started to set.
Long cracks running up the corners or along the tub are a separate case, and the first mistake below.
Seven installation mistakes behind most cracked shower tile
Tile is rigid. It can’t stretch, so whatever moves or softens underneath it shows up on its face. These are the seven ways that movement or moisture usually gets to it.
1. Hard grout where the tile needed a soft joint
Where two walls meet, where the walls meet the shower floor or the tub, and around the perimeter, the surfaces move a little independently. TCNA is direct about it: tilework always needs soft joints so it can expand and contract, membrane or no membrane (TCNA on crack-isolation membranes).
The Handbook’s movement-joint guidance is the method known as EJ171. Those joints get a flexible sealant, not cement grout: TCNA lists urethane, neoprene and polysulfide for traffic areas and silicone where foot traffic isn’t a concern (TCNA on joint materials).
When the corners were grouted solid, the grout gives way first, usually as a hairline the full height of the corner or along the tub. It’s a joint problem more than a tile problem, but the open line lets water into the wall.
2. A wall or floor that flexes
Tile cracks when what’s under it bends. For floors, the long-standing minimum TCNA cites is L/360: joists shouldn’t deflect more than their span divided by 360. On a 10-foot span, that’s about a third of an inch in the middle.
TCNA adds that tile has failed even on stiffer floors, which is why it leans on tested installation methods rather than one number (TCNA on deflection).
In a shower, flex shows up as a crack running across several tiles in a line: on the floor above a joist, or on a wall along a stud or a board seam.
In an older house, ask whether the joists under the bathroom were ever notched for plumbing, or are cracked or rotted. TCNA’s own troubleshooting list asks the same.
3. A backer that was never meant to get wet
The 2021 International Residential Code, the basis of South Carolina’s residential code, lists the boards allowed behind wall tile in tub and shower areas: glass-mat gypsum, fiber-reinforced gypsum, fiber-cement and cementitious backer units, each installed to its maker’s instructions (section R702.4.2).
It also bars water-resistant gypsum board, the green drywall in a lot of older bathrooms, wherever it will be directly exposed to water (R702.3.7.1, IRC 2021, Chapter 7).
Tile set on drywall inside a shower can look fine for years and then let go as moisture softens the board. Even with a membrane on top, TCNA says whether drywall works as backing depends on the membrane and board makers and on the local code official (TCNA on shower backing).
4. Backer seams and fasteners left unfinished
Backer boards come in sheets, and the joints between sheets are where a shower wall is weakest. Cement and fiber-cement boards are fastened on the spacing their makers specify, and the seams are taped and filled, typically with alkali-resistant mesh tape set in thin-set. Skip that, and the seam can open as the house moves.
The result is a straight crack across the tile at the height of the seam. On walls built with 3-by-5-foot sheets laid horizontally, the first seam sits about 3 feet above where the bottom sheet starts, which is the top of the tub or the pan rather than the floor.
Foam board systems have their own method: the joints are covered with the manufacturer’s waterproof banding, the lighter strips in the photo below.
5. Water getting behind the tile
Grout is not waterproof. The code asks for a nonabsorbent finish on shower walls to at least 6 feet above the floor (R307.2, IRC 2021, Chapter 3), but what keeps the wall dry is the layer behind the tile: a membrane over the backer, or a waterproof board system with sealed seams.
When water gets past that layer, wood and gypsum soften and swell, thin-set loses its grip, and tiles crack or pop loose, often near the valve, the niche or the bottom rows. Grout that stays dark long after a shower is an early sign.
On a full bathroom remodel, this waterproofing is part of the core scope, not an add-on.
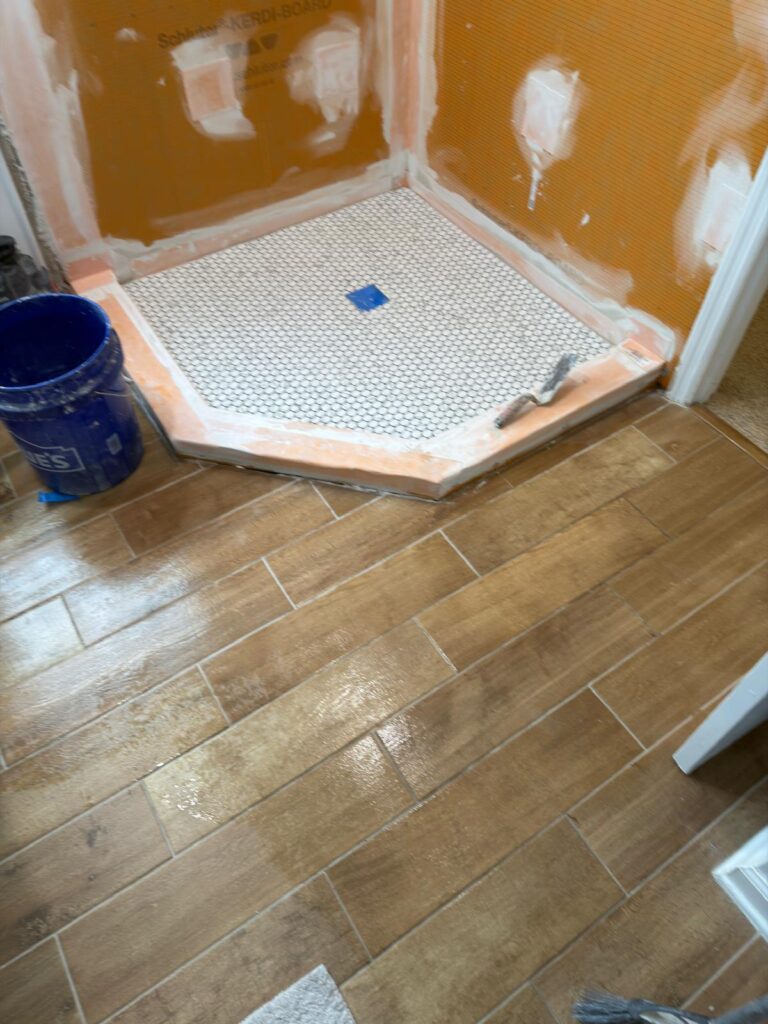
Waterproofing on one of our showers before the wall tile went up: a foam board system (the brand is printed on the panels) with the seams and the curb sealed, and the mosaic floor already set.
6. Thin-set voids under the tile
A tile needs solid contact with the mortar under it. TCNA’s answer on hollow and loose tile lists poor coverage, mortar applied in dabs, mortar used past its working time and mortar disturbed while curing among the reasons tile loses its bond.
A tile that isn’t fully supported cracks more easily under a heel or a dropped bottle. Tap suspect tiles with a screwdriver handle. A hollow sound alone isn’t proof (TCNA notes some floor systems sound hollow even when bonded), but hollow plus a crack or a loose edge is.
7. Grout mixed or packed the wrong way
Grout follows rules of its own. TCNA advises unsanded grout for joints narrower than 1/8 inch and sanded grout from 1/8 inch up (TCNA on grout joints).
Sand forced into a narrow joint can bridge it, so the grout only sits at the surface, and wall joints that weren’t packed hard are where that happens most. Extra water or additive leaves a weak, pinholed grout as it dries.
And one that isn’t an installation mistake: impact and drilling
A heavy bottle dropped on a floor tile, or a drill that grabbed while mounting a glass-door hinge or a grab bar, leaves a different mark: a star or short break radiating from one point, usually on a single tile.
If the tiles around it are solid and the grout is sound, this is the case where replacing one tile is a real fix.
What the crack pattern usually points to: a printable checklist
Print this section and take it into the bathroom. Find the pattern that matches, then do the check in the third column. It narrows the cause; only a look at the wall confirms it, a point TCNA makes too.
| What you see | Likely cause | What to check | How soon |
|---|---|---|---|
| Hairline in the grout up an inside corner, or where tile meets the tub or pan | Cement grout in a joint that needed to flex (mistake 1) | Is the corner grouted instead of sealed? Does the line catch a fingernail? | Soon: reseal before water gets in |
| Straight crack across several wall tiles, often at one height | Backer seam or stud movement (mistakes 2 and 4) | Does it sit at a consistent height, or follow a stud? Any loose tiles along it? | Soon: the wall likely needs opening |
| Crack running across several floor tiles in a line | Floor deflection or a crack in the slab below (mistake 2) | Does the floor feel springy near the line? Is there a joist or slab joint under it? | Soon |
| Star-shaped break in one tile | Impact, or a void under that tile (mistake 6) | Tap that tile and its neighbors: solid or hollow? | When convenient, if the neighbors are solid |
| Cracks plus tiles that sound hollow or move | Lost bond, often from water behind the tile (mistakes 5 and 6) | Tap across the wall; press on tiles near the valve and the niche | Now: stop using the shower if tiles move |
| Dark or crumbling grout, musty smell, stain on the ceiling below or the wall behind | Water is getting past the tile (mistake 5) | Look at the ceiling below and the other side of the wall | Now: limit use and have it opened up |
| Fine cracks all through the grout soon after installation | Grout mix or packing (mistake 7) | Scratch the surface: does it crumble? | Soon: regrout the right way |
Before anyone comes out, note these down. They save a lot of guessing:
- ☐ Where the cracks are: wall, floor, corner, tub line, around the valve or niche
- ☐ A photo of each, with something for scale
- ☐ When you first noticed them, and whether they’re growing
- ☐ Whether any tile moves or sounds hollow when tapped
- ☐ Stains, soft drywall or peeling paint below or behind the shower
- ☐ Roughly how old the shower is, and whether it was retiled over older tile
Is a cracked shower tile a problem? How to judge the urgency
A single cracked tile with solid neighbors is mostly cosmetic. A crack that catches a fingernail, open grout in the corners, or any sign of water behind the wall is a real problem: a shower is built to shed water, and every opening lets some through.
The longer that goes on, the more of the wall has to come out. Cracks that seem to appear overnight have usually been building; the tile holds until the movement or the loss of bond underneath passes what it can take.
If the checklist points to water or to a moving wall, that’s when to have someone open it up. Our tile installation in Charleston page explains how we assess the substrate and what we put in writing.
Fixing it: one tile, the grout, or the whole wall
The fix has to match the cause, or the crack comes back. TCNA says it plainly: a repair that doesn’t address why the tile failed may not last long.
- One tile: after an impact, with solid tiles around it, the grout is cut out, the tile removed and a matching one set. Keep spare tiles from the original job; shades change from one production lot to the next, and a perfect match is hard to find later.
- Cracked grout: it can’t be grouted over. TCNA says at least two-thirds of the old grout’s depth has to come out before new grout goes in. In the corners and along the tub, the grout comes out and a flexible sealant goes in.
- Sealer: a grout or tile sealer slows staining on the surface. It isn’t waterproofing, and it won’t stop a leak through a crack or replace the membrane behind the wall.
- A leaking shower without removing tiles: possible only when the water is getting in through the joints. If the waterproofing or the backer behind the tile has failed, the tile has to come off to rebuild that layer.
Covering the cracked wall with new tile doesn’t fix anything either: it buries whatever moved. We explain when a tile-over-tile job makes sense, and why a shower rarely is one, in tile over existing tile.
How a shower gets built so the tile stays put
On our tile jobs, the work starts with the part you won’t see. Our written estimates list substrate prep and waterproofing as separate lines, the layout is dry-fitted before anything is set, and grout goes in only after the mortar has cured.
Before we finish, you get the cure times for the products used on your shower in writing, so nobody runs the water too early.
Whether a cracked shower needs a repair or a rebuild depends on what the tile is sitting on, how far water has traveled, and whether the floor or only the walls are affected. That’s what we look at on a visit.
If your shower has cracks you can’t explain, request a written estimate through our Charleston tile installation page and we’ll come look at what’s behind them.
Keep reading